Are you a busy social media marketer?
Looking for tools to improve the way you work?
In this article, you’ll discover 10 apps and browser extensions to streamline the way you create content, write copy, and organize research.

10 Useful Tools for Creating Content, Writing, and Researching by Joel Widmer on Social Media Examiner.
#1: Speed Up Your Writing With TextExpander
TextExpander (available for Windows, Mac, and iOS) will match frequently used words, phrases, and templates to preset shortcuts to speed up your typing. When you type the shortcut, the expander automatically replaces it with the full text. If you use the same phrases over and over in your social media posts, this tool is for you.
You can sign up for a free trial of TextExpander to test it out. After that, you’ll need to upgrade to one of the paid plans, which start at $3.33/month when billed annually.
After you download and install the app on your computer, click the + button to create a new snippet, such as a thank-you message.
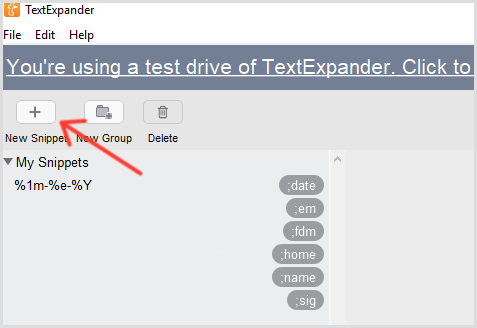
Next, select Plain Text from the Content drop-down list, write or paste the text you want to abbreviate in the big white box, and type your shortcut in the Abbreviation field, as shown below.

I recommend choosing an abbreviation you’ll remember, but not something you’d ordinarily type. It helps to start your abbreviation with a punctuation mark so you don’t accidentally type it.
To use your shortcut, just type your abbreviation in a text box (such as the Compose New Tweet box) and it autofills with your text.

Here are some words and phrases that likely deserve their own abbreviations:
- Social media post templates
- Brand/company names
- People’s names
- Website URLs
- Email addresses and signatures
- Phone numbers
- Answers to common questions
- Quick publishing checklists
- Autocorrect for common typos
- Frequently used social media responses
- Once you customize this tool, you’ll type at lightning speed!
#2: Organize Online Research With OneTab
How often does your Google Chrome browser look like this?
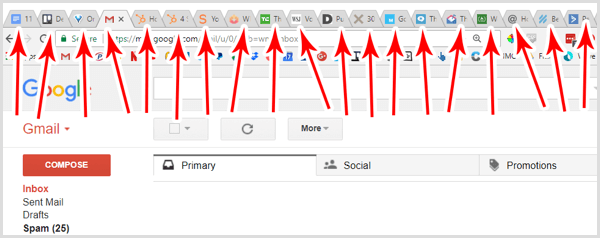
It’s not unusual to have dozens of tabs open, especially when you’re searching for social media content to share. But opening too many tabs at once can noticeably affect your computer’s performance. And if any of those tabs display content that automatically updates or streams (like a video, a rotating ad, or real-time comments), your bandwidth is strained.
The solution is OneTab, a free Chrome extension that will convert all of your tabs into a single list of links, which is less taxing on your computer’s memory and bandwidth. It’s also easier to use because you can actually read the page titles.
The biggest benefit of OneTab is that you can save groups of similar tabs so you can quickly open them at any time. For instance, if you share content from a group of similar blogs, you can conveniently open one tab that lists all of those sites. (You can also combine this feature with TextExpander to open multiple tabs with one shortcut.)
After you install the extension, click the OneTab icon on the toolbar to reduce all of your currently open tabs to a single tab. To quickly restore them, click Restore All.

When you consolidate your tabs with OneTab, your browser will run more smoothly and you’ll have all of your research organized in one place.
#3: Create Screenshots, Screencasts, and GIFs With CloudApp
CloudApp is a convenient way to create screenshots, GIFs, and screen recordings. Once you capture the media, it’s automatically stored on CloudApp’s server, so there’s no need to move it to your own space. It’s a remarkably fast way to capture social media content once you master the keyboard flow.
CloudApp has a great free version and paid plans starting at $8/month. After you download and install the app, press Ctrl+Shift+C (Windows) or Control+Option+C (Mac) to open the CloudApp window.
Then choose your action: screenshot, GIF, or screen recording.

Next, click and drag a box around the content you want to capture. The app lets you take a screenshot of only the part of your screen that matters so browser windows or empty space don’t distract your audience.

If you’re taking a screenshot, CloudApp captures the image as soon as you release your mouse. When you take a GIF or video, you have to click to start and stop the recording.
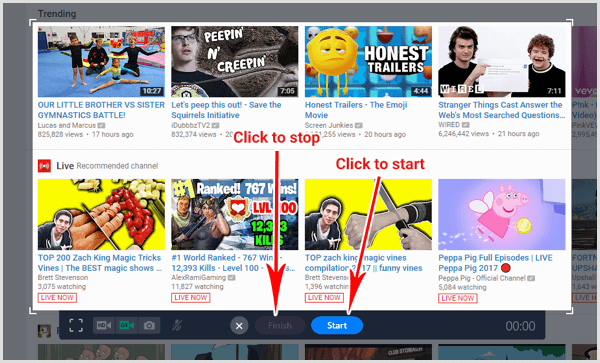
CloudApp automatically copies the URL of your image, GIF, or video to your clipboard and you’ll get a notification like this:

Just press Ctrl+V (Windows) or Command+V (Mac) to paste the URL into a browser tab, and your image, GIF, or video will appear.
Here’s the best part: You can annotate your images, too! Paste your file into a browser window and click Annotate.
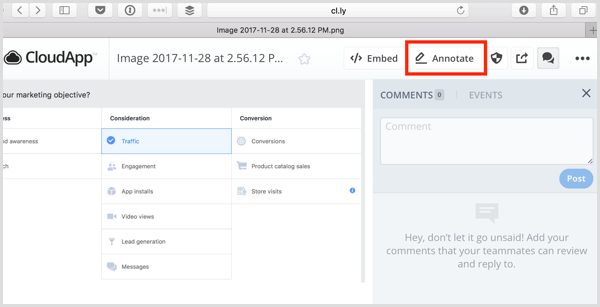
On the annotation screen, you can add shapes, arrows, lines, and text, and even blur sensitive info.

When you’re satisfied with your image, GIF, or video, save it for sharing later or simply paste the URL (don’t worry, it’s public) into a social media post.
Open your CloudApp dashboard to view, sort, and organize your content. Store your files here in case you want to repost the content later.
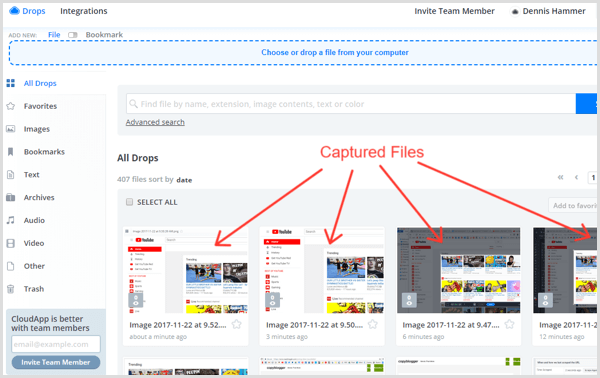
Once you get the hang of CloudApp, you’ll spend less time editing images in Photoshop or Illustrator and more time creating visual content.
#4: Build UTM Links With Google Analytics URL Builder Extension
Understanding where your traffic comes from is important, but Google Analytics has some limitations. For instance, it can tell you traffic came from Twitter, but it doesn’t tell you which link your Twitter followers clicked unless you include UTM parameters in the URL.
UTM parameters may sound complicated but they’re just lines of code attached to the end of a URL that allow Google Analytics to track your links for specific pages. They look like this:

Adding UTM parameters manually can be tedious. That’s where Google Analytics URL Builder comes in. It’s a free Chrome extension that lets you quickly craft UTM URLs for your social posts without having to leave the page.
This tool is especially helpful if you run cooperative social media campaigns with other brands. Give each brand its own UTM URL link so you can identify specific traffic sources.
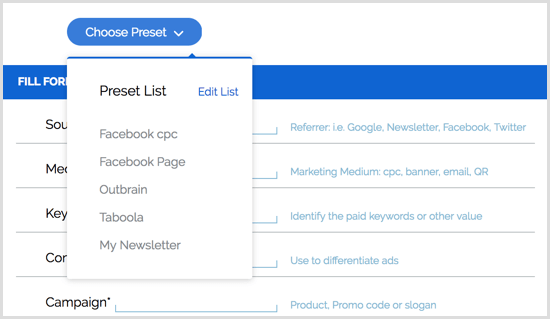
To use it, install the extension and then navigate to the page you want to link to. Click the extension’s icon on the toolbar and fill out the appropriate fields.

Here’s how to fill out each field:
- Source: Where the traffic is coming from (Example: Facebook Page)
- Medium: The specific element (Example: Cute Puppies Post)
- Keyword (optional): The term you used in any paid ads (Example: cute poodles)
- Content (optional): Additional details for split testing links
- Campaign: The overall campaign (Example: Cute Puppies Week)
Tip: Unless you’re running paid ads or split tests, you don’t need to fill in the Keyword, Content, or Campaign fields.
Use the presets section to remember your most-used parameters and save even more time!
#5: Set Up Shortcuts to Find Files With Alfred
If you use a Mac (sorry, Windows users), Alfred is about to become your favorite productivity weapon. It’s packed with features but it’s especially powerful for social media marketing.
You already know there’s a lot more to consistently creating stellar social content than what your followers see. There are behind-the-scenes planning and organizing, not to mention the editorial calendars and publishing standards you have to consult.
That’s where Alfred comes in.
It’s a free app similar to Mac’s Spotlight search, but 10 times smarter and more powerful. You can use a simple shortcut to open any file, folder, or Google doc on your computer. The best part: It learns your search habits and automatically sorts the results based on what you search most.
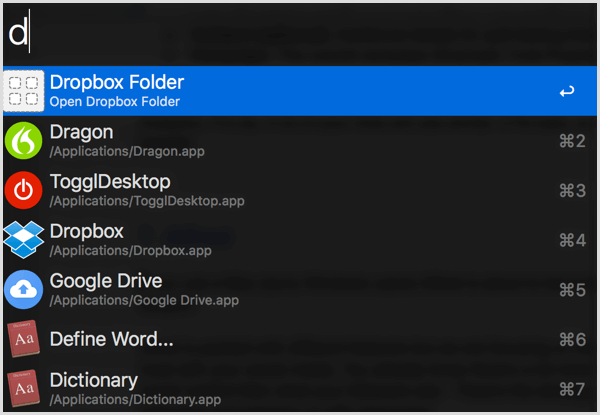
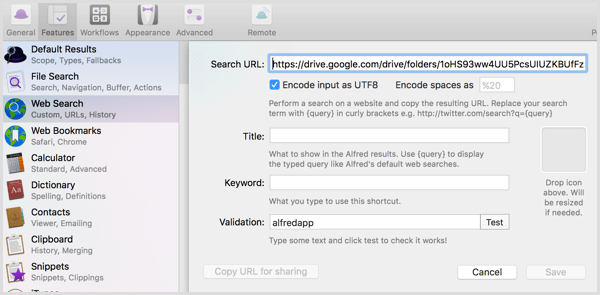
The Custom Search feature lets you create URL shortcuts to quickly open any page. For example, you can set it up to open Google Drive docs with a single keyword. Once you get the hang of it, it’s much quicker than digging through your bookmarks.
This technique is especially helpful to stay organized if you create social media campaigns for several clients and open multiple folders throughout the day.
For $25, you can upgrade to Alfred’s Powerpack, which is where the real magic happens. Here are a few of the features that can help you stay organized while managing multiple social media campaigns:
- It has a built-in text expander (like the tool I mentioned above) that syncs across your computers.
- You get access to hundreds of workflows you can use to automate tasks like shortening URLs, converting time zones, and testing landing pages in multiple browsers, all with just one keystroke.
- The clipboard manager lets you browse through your clipboard history so you aren’t constantly copying the same URLs between apps.
Even if you stick with the free option, Alfred is an enormous productivity boost.
#6: Improve Your Writing With ProWritingAid
ProWritingAid is a free online editing tool that helps you improve your writing. Not only does it flag errors, but it also recommends style improvements and helps you find the right words. If you write your social media posts in batches, the web app lets you check them all at once so you can proofread quickly and efficiently.
After you sign up, click Editing Tool at the top of the page.

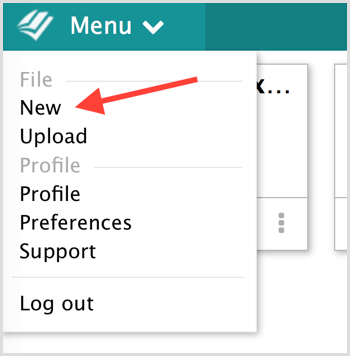
On the next page, click Menu and select New.
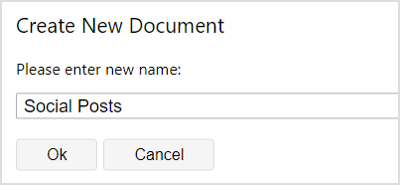
Enter a title for your new document.
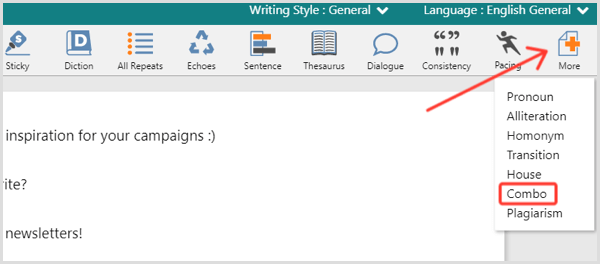
Next, paste your copy into the editor and select one of the writing checks at the top. Click the More button to see additional options such as my favorite, the Combo check.
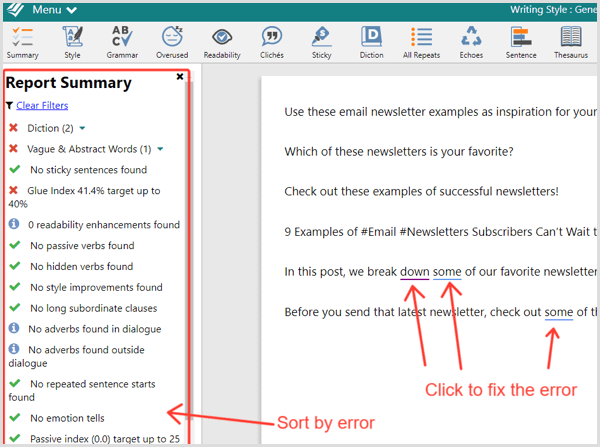
ProWritingAid will load for a second and then identify your mistakes. Simply go through the document and fix (or ignore) each flagged item.
This method is a great way to edit multiple social media posts at once, but it’s clunky to proofread them one at a time. For that, you want to install the ProWritingAid Chrome extension. After it’s installed, just hover your mouse over the icon in any field to open the editing options.
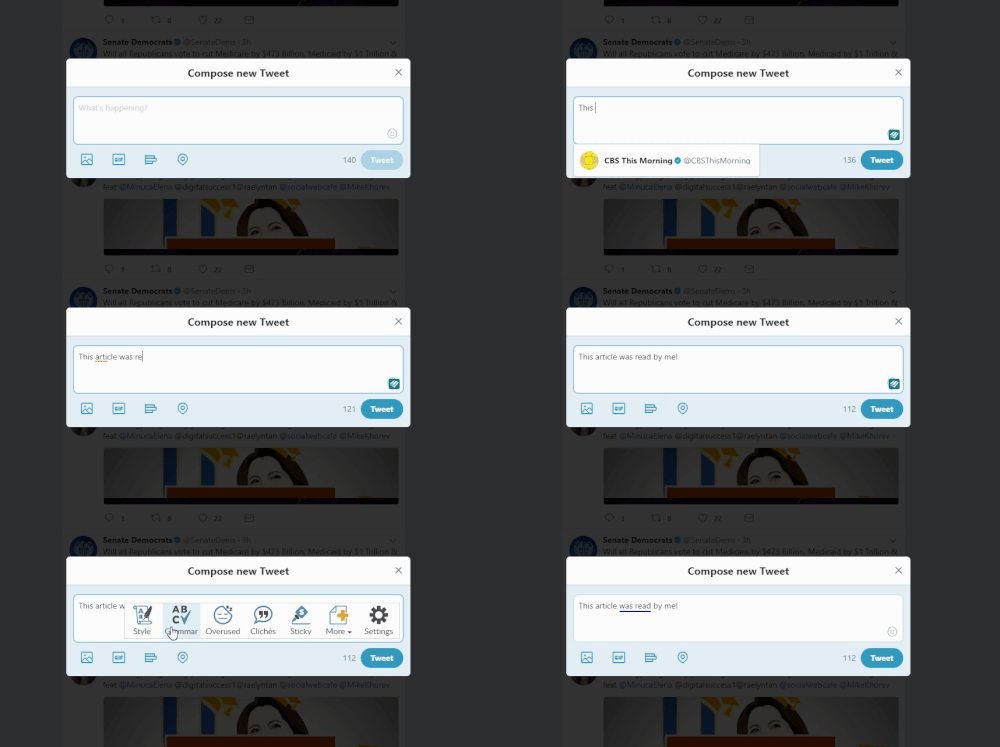
ProWritingAid also integrates with Google Docs, OpenOffice, Word, and Scrivener to make proofreading easier. Which proofreading reports are most important? Here are the best reports to run for social media posts (click for the full list):
- Writing Style Report – Improve readability.
- Corporate Wording Report – Simplify your language.
- House Style Check – Set your own rules (like “Always capitalize the word ‘Marketing.’”) for ProWritingAid to flag.
- Sticky Sentence Report – Identify sticky sentences (with too many words like “to,” “of,” “at,” “if,” etc.) so you can clarify.
- Overused Words Report – Add variety to your posts. Overused words are particularly noticeable in social media content where there isn’t much text to begin with.
- Plagiarism Report – Avoid plagiarized content.
- Combo Report – Customize any combination of reports to run at once.
#7: Record Tutorial Videos With Loom
Loom is a free, lightweight, easy-to-use tool for creating your own video tutorials. With just two clicks, you can capture your screen, camera, or both. Plus, Loom creates a unique page for each video that you can share on social media without downloading and uploading to another source.
After you install the Chrome extension and log in, click the Loom icon in your browser toolbar. You’ll then see the following window.
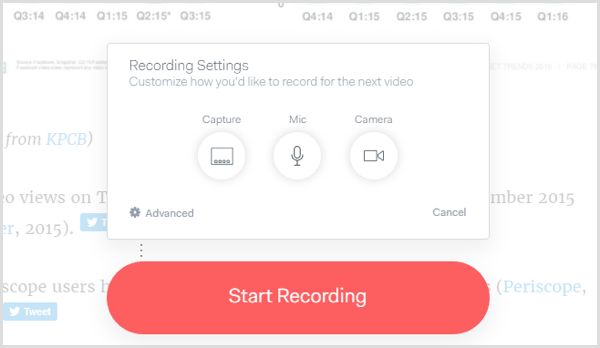
Click Capture and choose what you want to record: your current browser tab, entire desktop, or cam only. Click Mic to choose a microphone. Click Camera to choose a camera or turn yours off if you don’t want to record your face.
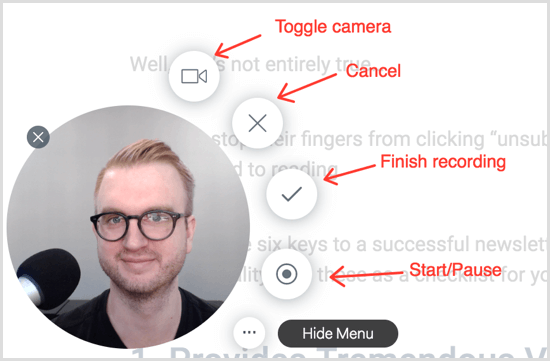
Next, click Start Recording. Loom will give you 3 seconds to prepare yourself. Use the controls at the bottom left to pause, finish, or cancel. (If you’re recording your camera, you’ll see yourself here as well.)
Once you click Finish, Loom will redirect you to the video’s page, which looks like this:
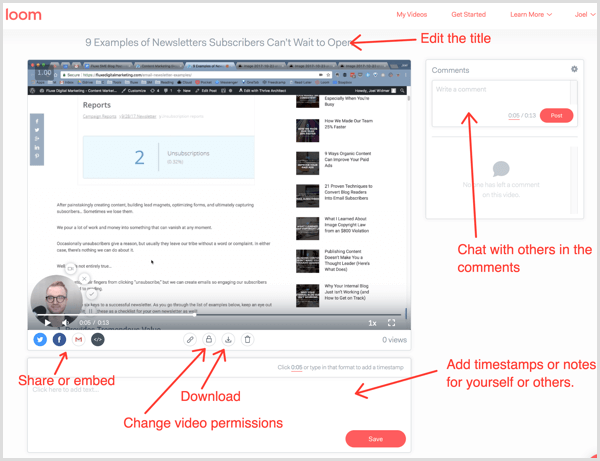
On this page, you can add a description and comments, which everyone who visits the page can see. You can also share the video on social media or copy HTML code to embed it on a web page.
Tip: If you like making videos for your fans, another great tool worth checking out is Soapbox. It lets you switch seamlessly between your camera and desktop, offers several easy-to-use editing features, and lets you create a call to action at the end of your video.
#8: Expand Your Clipboard With Weava
Have you ever copied text or an image to your clipboard, only to realize you just overwrote something else you’d saved? If so, you need Weava. It’s a powerful free Chrome extension with a suite of organization and highlighting features, but the expanded clipboard is especially useful for juggling a lot of social media content.
After you install the extension, highlight a section of text or an image like you normally would and then choose a color from the pop-up palette. Your text or image is then saved to Weava.
Next, highlight something else, but this time select a different color.

Click the Weava icon in your browser to open your collection. You’ll see a list of everything you’ve highlighted.
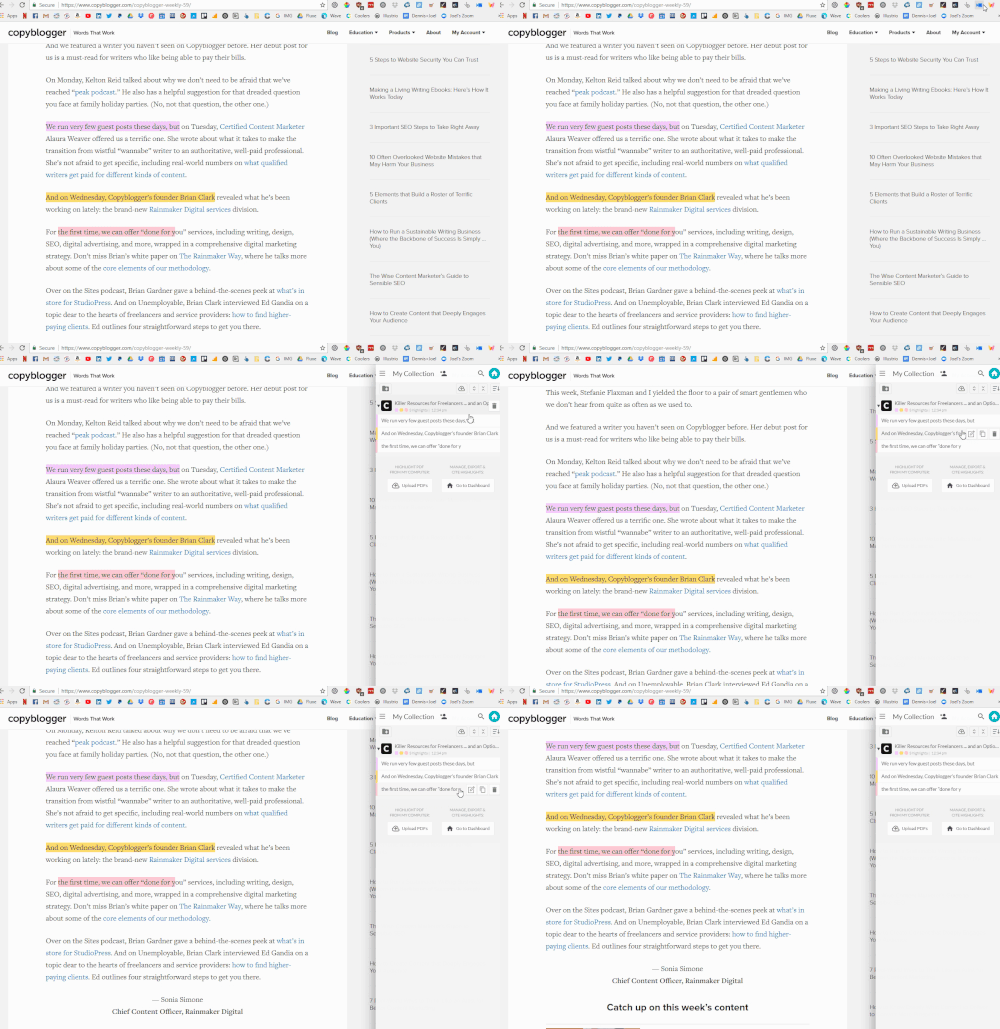
Hover over a selection you want to use and click the Copy icon. Then press Ctrl+V (Windows) or Command+V (Mac) to paste it into your social media post.
With Weava, you’ll never lose copied material again!
#9: Transcribe Posts With Google Docs Voice Typing
Google Docs Voice Typing is a powerful transcription tool built into Google Docs, and of course, it’s free! It’s a clever way to jot down your thoughts as you perform your social media research.
For instance, you could let it run while you read articles. If you learn something interesting that deserves its own social post, simply dictate your thoughts to Google while you browse. Later, you can turn those thoughts into captions for your social posts.
Google Docs Voice Typing is remarkably easy to use. Just open a Google doc in Chrome and select Voice Typing from the Tools menu.
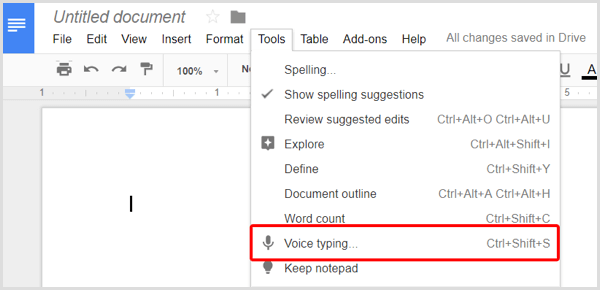
A microphone toggle will appear (you may have to authorize Google to access your mic). Simply click the icon to turn on the transcription. Then start speaking.

Pro Tip: Say “period” and Google will end your sentence with a period. Say “new line” and Google will drop down a line.
Use this tool to speed up your note-taking so you can focus on curating awesome content and writing engaging copy.
#10: Identify Who Shared Your Content With CrowdTangle
Wouldn’t it be great to know exactly who shares your content? Then you could reach out to those people and build deeper relationships. To get this information, you need a free app called CrowdTangle.
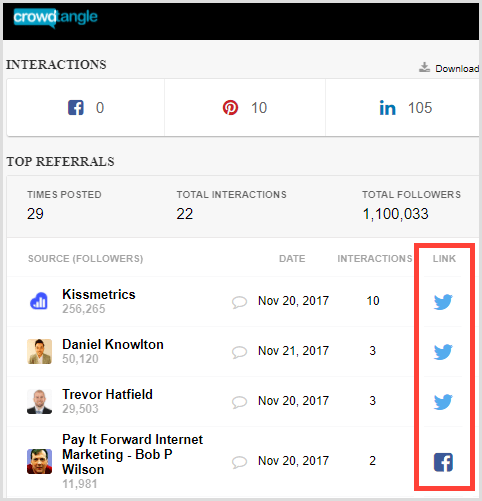
After you install the CrowdTangle Chrome extension, open any page and click the extension’s icon in your browser toolbar. A menu will appear with the names of everyone who shared that page.

Click the social media icon next to an influencer’s name to open the post where they shared your content. Show your support by liking, sharing, or commenting on their post.
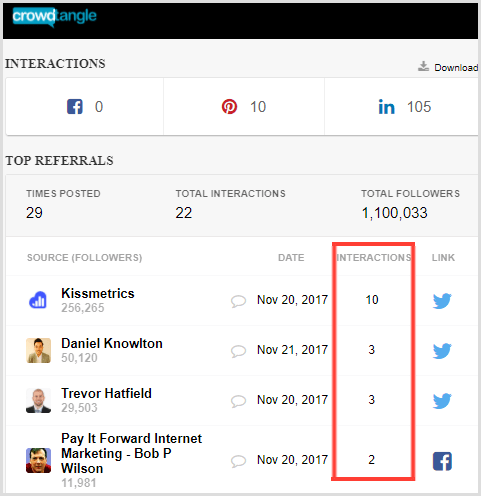
Look at the Interactions column to see the number of times an influencer has interacted with the page. Use this to find people who have shared your page multiple times. Reach out to these people to build relationships!
To take CrowdTangle one step further, examine your competitors’ pages. Uncover who’s sharing their content and contact those influencers.
Over to You
These unique social media tools can save time, improve your content creation and curation, and make your life and work easier. Experiment to find the tools that work best for you.
–
This article first appeared in www.socialmediaexaminer.com
Seeking to build and grow your brand using the force of consumer insight, strategic foresight, creative disruption and technology prowess? Talk to us at +9714 3867728 or mail: info@groupisd.com or visit www.groupisd.com


